Christine de Beer - effortless floral craftsman
Patina Copper
- 24 November 2021
- click to send Christine a smile
- and more
Patina Copper Christmas Mini Workshop
In the eighteenth century the craftier designers amongst us would have used distilled wine to finish our patinated objects which, you have to admit, is a whole lot better than sealing our copper crafts we wanted patinated in dung… and wait… and wait… as they did in the middle ages.
My technique is even better, for one thing- it works in minutes. Develops even more overnight to a rich colour and maybe best of all for our creative purposes: the results can be adjusted and tweaked to suit your design needs.

"Patina" is a term that refers to the blue-green (Verdigris) layer of corrosion that develops on the surface of copper. As the copper ages and becomes weathered a natural discolouration changes the surface texture as it is exposed to atmospheric elements such as oxygen, rain, acid rain from industrial processes and coal fire, carbon dioxide and sulfur bearing compounds. Rust is a form of patina.
In this Tutorial we look at the chemical process of deliberately exposing copper to salt, vinegar and ammonia called patination. And I show you a few patinated Christmas design accessories as examples of how you can creatively adjust and work with the effect and colour.

Oh yes, this is one of those “splash” and a “dash” and a “pinch” recipes. It is because it will work regardless of how generous you splash or dash or pinch. Mix the salt, vinegar and ammonia and apply and you will get a lovely patina on your copper plate or object distressing it just enough to add a nostalgic glow and dull down the “I am new here” shine- perfect for nature inspired designs. It works every time- I know... I have been using it for years. This design is from 2010. I was quite obsessed with copper accessories for my designs back then. I first published the Tutorial back in 2011-03-18 it has become one of my most popular Tutorials so I thought I would revisit it and add what I have learned since then.

As with dashing and splashing and pinching the ingredients when you measure them out your results will also depend on where you live because the light and air quality and humidity also changes the results. Even how tightly you seal the copper when exposed to the chemicals… but I will show you all that as we continue to explore more. Let’s begin with the basic recipe to add a patina to copper:

Pour course salt into a container.
Pour a few drops of vinegar and ammonia in. Add the copper. Seal the container. Give it a shake and store it overnight.

The result is an exquisite bright blue green powdery patina. Handle copper with care- the patina will rub off. In time the effect will become permanent. Make everything you need for a project in one batch because it is hard to duplicate the exact colour time after time.
Make sure you handle the mixture in a well ventilated area.
Lesson 1:
It’s the most… it’s the most... Glowing-est Patina Christmas of all!

Copper Lantern showing the basic patina recipe
For my lantern strips I made a very basic mixture. A bed of coarse salt and a few drops of vinegar and ammonia. Just enough to cover the strips when I give the container a good shake.
Design note: you will clearly see the difference in results from next week onwards when I show you a comparison of mixtures.

Within a few minutes you could already see the patina develop on the copper strips.

Developing into a bright blue patina leaving bits of distressed copper in between overnight.

Perfect to craft into my lantern
Here is the
Patina Copper Lantern
Tutorial
And now I can't wait to show you next week's Patina Copper Christmas design. It is hard to believe I am using exactly the same technique...

Then in
Lesson 2:
It’s the most… it’s the most... Glowing-est Patina Christmas of all!
we look at how to get a really vivid more turquoise copper patina

Place the copper in a glass container and add a generous layer of coarse salt.

Add a few drops of ammonia and a few drops of vinegar over the salt.

Just a few drops so that the salt is barely wet.

Cover (but don't completely seal) the container with plastic wrap.

Swirl the copper in the mixture...

Let it stand overnight to develop.

To the brightest blueish green

Compared with the basic patina recipe where you get a slightly more blue tint.
And next week's Patina Copper Christmas design is an even more dramatic result with just the tiniest tweak...

Lesson 3:
It’s the most… it’s the most... Jingle Patina Christmas of all!
This week I showed you how to add a green patina to copper.

For an even greener result cut way back on the salt content.

In fact all you need for a green patina is a pinch of salt with the usual amount of ammonia and vinegar.

Close the copper with a double layer of plastic and swirl it around.

As the colour develop you can see it looks more rusty green than the basic recipe I showed you above.

The result from letting it stand overnight.

As it dries the green becomes more prominent.

Set the bells on paper to dry thoroughly before handling...

... to a natural green patina on the copper bells.

That looks beautiful with natural design elements.
which makes me think... no... wait that is for lesson 3 when I show you what to do if you want to add a patina to a copper object too big to place in a glass bowl.
Lesson 3:
It’s the most… it’s the most… wonderful Patina Copper Christmas Tree of all!

For bigger copper objects mix the chemicals and place it in a spray bottle or paint it on the object. Or pour it out on the object and guide it where you want it with a wooden skewer.

Cover the copper object with a double layer of plastic and secure with painters tape.
Let it develop overnight.

And you will have a lovely blue green patina in the morning
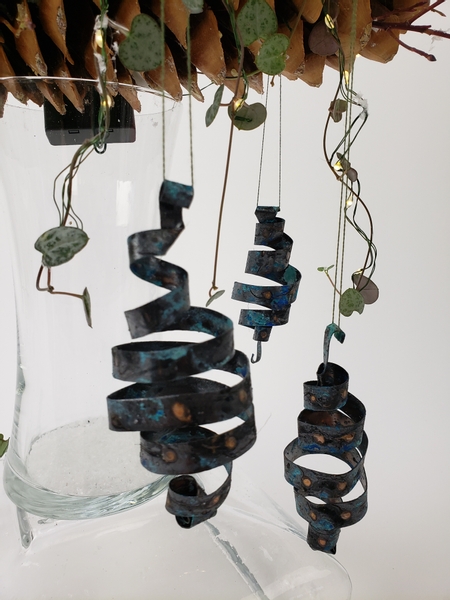
and this week in Lesson 5... well it's Christmas and as a special treat I showed you two techniques.
It’s the most… it’s the most… wonderful Patina Copper Spiral Bauble Christmas of all! The first is how to block the chemicals with hot glue and the second is how to tweak the basic recipe to get a gorgeous blue Patina.

I wanted to mirror the scales of the pinecone I added polka dots to the spiral bauble.

Before exposing the copper to the chemicals block out the areas you want to protect with hot glue ...
You can find detailed instructions on how to spiral copper strips to craft the baubles in the Tutorials linked below.

Place the spirals in a glass container and add the basic mixture of salt, ammonia and vinegar into the container before sealing it.

Shake up the mixture to cover the copper.
And set it aside to develop overnight.
For a dark blue patina:

Keep the copper sealed in the container for about four weeks.

It will go from blue green will turn into this rich royal blue.

Compared with copper left in the mixture overnight.

Lift away all the hot glue dots with a bamboo skewer to reveal the copper underneath.

Copper spiral baubles ready to design with.
and next week is the last design in our mini workshop and I am going a bit overboard on everything... see you next week.

... and then lastly... How often do we really find a... "you can't get it wrong" tutorial?
Well this is one of those. I wanted to show you how pretty the patina looks if you overdo absolutely everything. You really can't get this wrong.
I showed you how to make Party popper inspired copper curls

Cut the left over copper into thin strips

Place the curls in a glass container and add some vinegar, salt and ammonia. Close the jar and give it a shake.
Set it aside to develop. Overnight should already be enough. But for this one I left it 5 weeks just to see what happens.

After five weeks you will have these rustic copper curls with a lovely black and deep blue green patina.
Let the curls dry on a paper towel.

And watch how it becomes more vivid within minutes!

and once dry the copper curls ready to design with...

Carefully add the curls to your design. The patina will still chip off at this stage but will become permanent over time.
Book readers turn to page 37 where I show you how to pad your pliers so that you can curve and curl the copper without damaging it.
For more information about my book:
The Effortless Floral Craftsman
Sign up for my weekly newsletter
Every week I add a new design with related tutorials. Be sure to subscribe to receive an email notification with design inspiration.
Tutorials


Break pine scales from the cone and glue on a wreath frame to create a continuous pine scale wreath

Wire short twigs around wire rings to create rustic flameless tea-light lanterns

This is the easiest battery operated votive candle lantern to hand craft from a copper sheet... ever! As always with my Tutorials you will not need any special tools or workshop...


Up-cycle a pot scrubber to get a huge roll of very pretty copper wire


Cut stars from a copper plate for a lovely turquoise patina Christmas decoration.

Craft a twig and foam snowman with an inner glow.

Easiest bell DIY. Add a bit more character by chemically treating the bell to have a lovely green patina.

A design that is aged to ring in the new. Perfect for the a New Year's celebration.
Favourite Flowers

Rosary vine, Chain of Hearts, Collar of hearts and String of hearts
Related Designs


Christmas Flower Trends 2011 starts with a Floral Craft Assignment from the Floral Trends Design Group to make an Earthly Angel garden decoration.

August is the month for retail florists and wholesalers to start designing, ordering and preparing their product range for the Christmas and Festive Season. This is my article...


This is the first of my Christmas 2021 series of designs. This year in the form of a mini workshop… my Christmas present to you. We will explore how to patina Copper and use it to...

This is the second of my Christmas 2021 series of designs. This year in the form of a mini workshop… my Christmas present to you. Craft a three twig sphere snow man to proudly...

This is the third of my Christmas 2021 series of designs. This year in the form of a mini workshop… my Christmas present to you. Craft the easiest copper bells to hang in a...

This is the fourth of my Christmas 2021 series of designs. This year in the form of a mini workshop… my Christmas present to you. Paint copper to add a beautiful patina to a...

This is the fifth of my Christmas 2021 series of designs. This year in the form of a mini workshop… my Christmas present to you. This week I will show you how to add a mostly...

This is the sixth of my Christmas 2021 series of designs. This year in the form of a mini workshop… my Christmas present to you. This week I will show you how to go overboard on...


My article looking at contrasts and 6 winter lantern designs featured in the DIY Wedding Magazine