Christine de Beer - effortless floral craftsman
How to make a just-picked-it-a-moment-ago snow covered icicle and mistletoe hanging branch bunch
- 27 November 2019
- click to send Christine a smile
Because so many of the ingredients for this design are “made” rather than “picked” I wanted my hanging winter bunch to look gathered not styled. For the same reason I added a knot and not a bow to the top, in luxury sparkling ribbon for just that touch of special Christmas detail.
Make sure the eucalyptus branches are fresh and pliable. If not soak the branches overnight in warm water. See the Tutorial right below this Tutorial for more detailed information about manipulating plant material. I also have a detailed section about it in my book if you want even more information.

The foundation of my hanging bunch design is build around this faux mistletoe branch. This is my last and final design on how to design with artificial plant material.
There is a Tutorial below in the Tutorial section on how I prep my artificial plant material before designing with it. I also have a Tutorial for how to add longer stems to the faux branches.

Once you have prepared your faux mistletoe stems they are ready to include in the bunch...
Now let's add the twig covered wired branches:

Remove the cord from glass icicle Christmas decorations.

Cut a length of wire.

Bend the wire in a sharp hairpin, at about the middle point of the wire...

Slip a glass icicle into the bend in the wire.

Twist the wire to secure the icicle.

Bend the wire away from the twist and add another hairpin bend.

Slip in another icicle to rest in the bend and twist the wire to secure.
This is the basic idea for adding in side branches. You can alter this to include as many branches as you need in your design.

To add a new stem to the branch simply twist another wire...

To secure another icicle...

And wire it into the main branch.

Extend the new wire from the side stem down the branch and twist it together for a sturdy wire branch

Go back and twist some more wire around the main branch so that it can easily carry the weight of the glass icicle.
Design note: Rather be over generous when crafting the stem. These icicles are really fragile and will break if you drop them!

My wire icicle stem ready to design with.
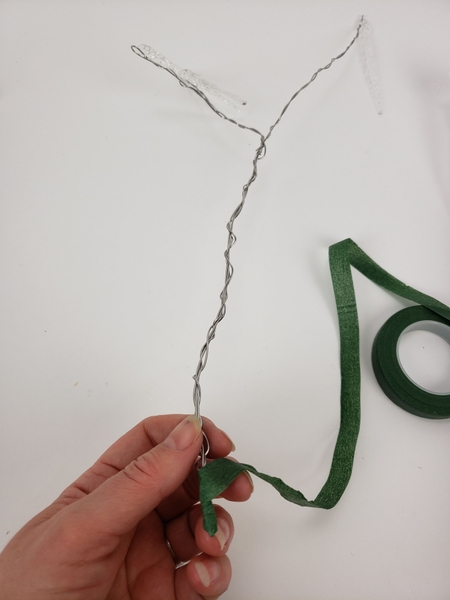
You can, of course use the silver branch but I wanted to add impossibly delicate twigs into my design to complement the glass icicles. So, I wrapped the branch with florist tape...
Newsletter subscribers: I have a tip for you about mindful-wrapping this week. It will make your task of adding the delicate stems so much easier!

My wired and taped icicle branch...

Lift the stems up and make sure they can carry the weight of the icicles before adding the fragrant eucalyptus stems.

Make sure the eucalyptus you are using is fresh and pliable. The twisting and weaving of these stems can get tricky and the last thing you need is to struggle with weaving stems that snaps!
You will find a few hinds below in the Tutorial section on how to prepare weaving stems.

Strip the leaves from the fresh stems and snip the branches. I am first wrapping the stems with this thin side branches to cover it and then I am adding decorative stems to make it look pretty.

Slip a stem through the hairpin bend in the wire, just below the icicle.

Bend both sides down and wind the longer stem around the tip of the stem to secure.

Press the next weaving stem through a gap in the first stem and again wind it around the wire.

When you get to the end of a weaving stem slip it through a gap in the previous stem to secure...

And every new stem gets wound around the previous one to keep that in place

When most of the wire is covered in twigs add the decorative twigs.

Strip away the foliage from the decorative weaving stems.

Do not cut away the side branches from these twigs...

Simply slip the first side branch through the hairpin bend and wind the stem down the wired branch.
Be very careful not to snap the weaving stem, not to break off the side stems... and not to accidentally wind in the side branches. All the side branches should extend away from the wired branch to give it a naturally wild look. Wind only with the main weaving stem.

Secure the weaving stem by pressing it through the winding stems.

My icicle branches are now ready for a dusting of snow...
See the Tutorial below in the Tutorial section for detailed instructions on how to add snow to your design elements.

Set the snow covered branches aside so that it can dry completely...

Once dry shake away any snow... and we are ready to assemble the bunch.
Again... I did not want my bunch to be overly styled. The artificial bits are already too "perfect"

Place the stems on a flat surface and add the mistletoe...

Build up the bunch by alternating between mistletoe and a wired branch.

Gather the bunch in your hand.

And secure it with a twist of wire

I am hanging the bunch from a simple loop and the most amazing knot.
You will need two sections of ribbon. The first to make this loop. Adjust the tail of the loop so that one end is longer than the other. You are making the knot over the loop (with the second section of ribbon) and then using the longer tail of the looped ribbon to tie the decorative knot at the top.

The gathering knot from my book deserves a special, special mention. Book readers see page 59 for your step by step Tutorial for this knot… it’s wonderful to tie any handheld bouquet and neatly combine a bundle. Once you know this knot it is sure to be a “go-to”!

I finished the bunch with a simple knot using the long tail from the loop and the long tail from the gathering knot.

The short tail from the looped ribbon goes back into the covered stems to conceal it.

Trail the ribbon down the sides of the bunch...

And add a dusting of snow to the twigs...

And a dusting of snow to the mistletoe.

Once dry gently shake the bunch to remove the snow bits that are not glued to the design and hang the bunch.
Sign up for my weekly newsletter
Every week I add a new design with related tutorials. Be sure to subscribe to receive an email notification with design inspiration.
Tutorials


What if you absolutely HAVE to decorate with faux plants? Here are my guiding rules when it comes to styling with permanent botanicals

A sprig of wired faux plant material is easy to bend back into a more natural position. Plastic plant material without a wire in their stems need a bit of help to get back into...

Artificial snow can be very "chemical" and flowers deteriorate quickly when exposed to it. It also dissolves in water. I use candle wax as "snow"

Just a few adjustments can transform a boring artificial wreath into a high end looking designer decoration.

I wanted my design to look more "found this way" than "designed this way" so I strategically tangled the ribbon to dangle down the design rather than tie it in a neat bow.


Glue curved twig snippets to craft a delicate winter white Christmas tree

Cover a wreath frame with bark strips and fluffed out cotton

Use delicate sprigs of cypress or juniper, fir, pine, eucalyptus, ivy or a combination of them all to create a winter themed kissing bough

Use a cardboard shape to craft a simple wire Christmas star

Most stems, twigs and even sturdier branches can be bend into shapes. It takes practice and more than a bit of patience. The main idea is to slowly manipulate the branch without...
Related Designs

Design 3 looking at How to style with artificial plants and branches using quality faux plants and stems. This week: mistletoe! And also .. give your faux a reason for being...

Design 2 of my three week pre-Christmas designing series looking at How to style with artificial plants and branches using quality faux plants and stems. This week: wired branches

Design 1 of my three week pre-Christmas designing series looking at How to style with artificial plants and branches using quality faux plants and stems. This week: a wreath

A Merry Christmas Twig Snowflake

A sticky shooting star made with gypsophila stems and fluffy dandelion seeds


Glue the most delicate twig table top Christmas tree

Cover a wreath frame with bark and cotton for a textured Christmas wreath design


A wire Christmas star with a secret plan to hide the twinkle